If you’re using Forminator on your WordPress site and want to set up conversions for Google Ads, you’ve come to the right place.
Let’s take a look at how you can do that through Tag Manager. This is the recommended implementation method, and you should follow up with setting up Enhanced Conversion Tracking for Forminator as well.
We will use AJAX for our forms, and we will set the triggers to fire on the ajaxComplete event. This guide uses the methods and resources from technicallyproduct.co.uk, the Ajax form submission guide from AnalyticsMania, as well as the AJAX listener from Bounteous.
Let’s get going.
Conversion Linker Tag
The first thing you need when tracking Google Ads conversions through Tag Manager is a Conversion Linker Tag.
This is very easy to set up, so if you don’t have one already, go to Tag Manager, create a New Tag, select Conversion Linker, and set it to fire on All Pages.
No additional configuration is necessary.
Setting up the AJAX Listener Tag
By default, Forminator uses AJAX. This means there is no thank-you page, and the form just refreshes itself while displaying a thank-you message. This makes normal tracking via a thank-you page more complicated. For this, we will have to create a Custom HTML Tag that fires on all pages and add a piece of code to it.
So, go to Tag Manager, create a new Custom HTML tag, and paste this code:
<script id="gtm-jq-ajax-listen" type="text/javascript">
 (function() {

 'use strict';
 var $;
 var n = 0;
 init();

 function init(n) {

 // Ensure jQuery is available before anything
 if (typeof jQuery !== 'undefined') {

 // Define our $ shortcut locally
 $ = jQuery;
 bindToAjax();

 // Check for up to 10 seconds
 } else if (n < 20) {

 n++;
 setTimeout(init, 500);

 }

 }

 function bindToAjax() {

 $(document).bind('ajaxComplete', function(evt, jqXhr, opts) {

 // Create a fake a element for magically simple URL parsing
 var fullUrl = document.createElement('a');
 fullUrl.href = opts.url;

 // IE9+ strips the leading slash from a.pathname because who wants to get home on time Friday anyways
 var pathname = fullUrl.pathname[0] === '/' ? fullUrl.pathname : '/' + fullUrl.pathname;
 // Manually remove the leading question mark, if there is one
 var queryString = fullUrl.search[0] === '?' ? fullUrl.search.slice(1) : fullUrl.search;
 // Turn our params and headers into objects for easier reference
 var queryParameters = objMap(queryString, '&', '=', true);
 var headers = objMap(jqXhr.getAllResponseHeaders(), '\n', ':');

 // Blindly push to the dataLayer because this fires within GTM
 dataLayer.push({
 'event': 'ajaxComplete',
 'attributes': {
 // Return empty strings to prevent accidental inheritance of old data
 'type': opts.type || '',
 'url': fullUrl.href || '',
 'queryParameters': queryParameters,
 'pathname': pathname || '',
 'hostname': fullUrl.hostname || '',
 'protocol': fullUrl.protocol || '',
 'fragment': fullUrl.hash || '',
 'statusCode': jqXhr.status || '',
 'statusText': jqXhr.statusText || '',
 'headers': headers,
 'timestamp': evt.timeStamp || '',
 'contentType': opts.contentType || '',
 // Defer to jQuery's handling of the response
 'response': (jqXhr.responseJSON || jqXhr.responseXML || jqXhr.responseText || '')
 }
 });

 });

 }

 function objMap(data, delim, spl, decode) {

 var obj = {};

 // If one of our parameters is missing, return an empty object
 if (!data || !delim || !spl) {

 return {};

 }

 var arr = data.split(delim);
 var i;

 if (arr) {

 for (i = 0; i < arr.length; i++) {

 // If the decode flag is present, URL decode the set
 var item = decode ? decodeURIComponent(arr[i]) : arr[i];
 var pair = item.split(spl);

 var key = trim_(pair[0]);
 var value = trim_(pair[1]);

 if (key && value) {

 obj[key] = value;

 }

 }

 }

 return obj;

 }

 // Basic .trim() polyfill
 function trim_(str) {

 if (str) {

 return str.replace(/^[\s\uFEFF\xA0]+|[\s\uFEFF\xA0]+$/g, '');

 }

 }


 })();
 /*
 * v0.1.0
 * Created by the Google Analytics consultants at http://www.lunametrics.com
 * Written by @notdanwilkerson
 * Documentation: http://www.lunametrics.com/blog/2015/08/27/ajax-event-listener-google-tag-manager/
 * Licensed under the Creative Commons 4.0 Attribution Public License
 */
</script>
Then make the tag fire on All Pages. Ideally, you can make the tag fire only on the page you have the form, like the Contact page. But if you don’t know where the forms reside exactly, just use All Pages.
Create the Google Ads Conversion
Once we have the AJAX Listener Tag ready, we need to create the Google Ads Conversion and the Conversion tag.
- Go to Google Ads -> Conversions, click on “New Conversion Action”
- Select Website Conversion, input your website, and scan it.
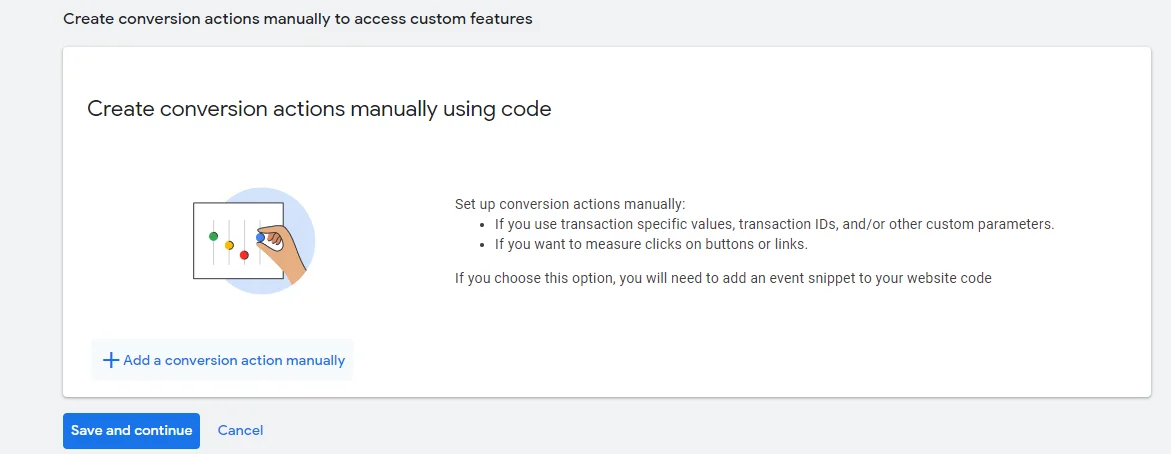
- Select “Add a Conversion Action Manually”
%22%20transform%3D%22translate(1.8%201.8)%20scale(3.51563)%22%20fill-opacity%3D%22.5%22%3E%3Cellipse%20fill%3D%22%23c6c6c6%22%20rx%3D%221%22%20ry%3D%221%22%20transform%3D%22rotate(13.2%20-355.7%20168.8)%20scale(35.92884%2024.31344)%22%2F%3E%3Cellipse%20fill%3D%22%23fff%22%20rx%3D%221%22%20ry%3D%221%22%20transform%3D%22matrix(196.03526%20119.1913%20-52.70629%2086.68662%20133.4%202.1)%22%2F%3E%3Cellipse%20fill%3D%22%23dedede%22%20cx%3D%226%22%20cy%3D%2283%22%20rx%3D%2223%22%20ry%3D%2223%22%2F%3E%3Cellipse%20fill%3D%22%23fff%22%20cx%3D%2273%22%20cy%3D%2230%22%20rx%3D%22255%22%20ry%3D%2231%22%2F%3E%3C%2Fg%3E%3C%2Fsvg%3E)
- Select the Conversion Goal. We’re going with “Submit lead form”
- Name the Conversion something that makes sense
- Under Value, we recommend selecting “Use the same value for each conversion” and entering a value such as 10 or 100.
- The reasoning is that you may want to use automated bidding strategies such as Maximize Conversion Value, which makes use of this value.
- Ideally, you would have an idea of how much this lead is worth to your business.
- You can also select “Don’t use a value for this conversion action”
- Under Count, select “One”, which is recommended for leads, sign-ups, and other conversions.
- You can leave everything else as it is unless you know you have a very high conversion window. This is typically not the case with lead forms.
- Click Save, and Save and Continue.
Track Google Ads Conversion in Tag Manager
After you’ve created the conversion in Google Ads, you need to go to its settings, scroll down to Tag Setup, and select Tag Manager.
Under Google Tag Manager you will find a Conversion ID and a Conversion Label.
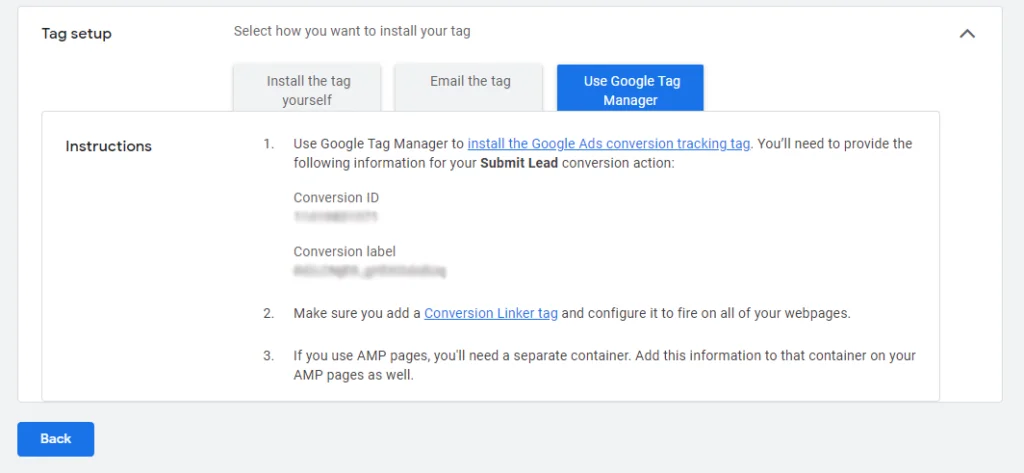
You will need to add these to the Google Ads Conversion Tag in Tag Manager.
- Go to Tag Manager
- Create a New Tag and select Google Ads Conversion Tracking
- Copy the Conversion ID and Conversion Label from the newly created conversion in Google Ads.
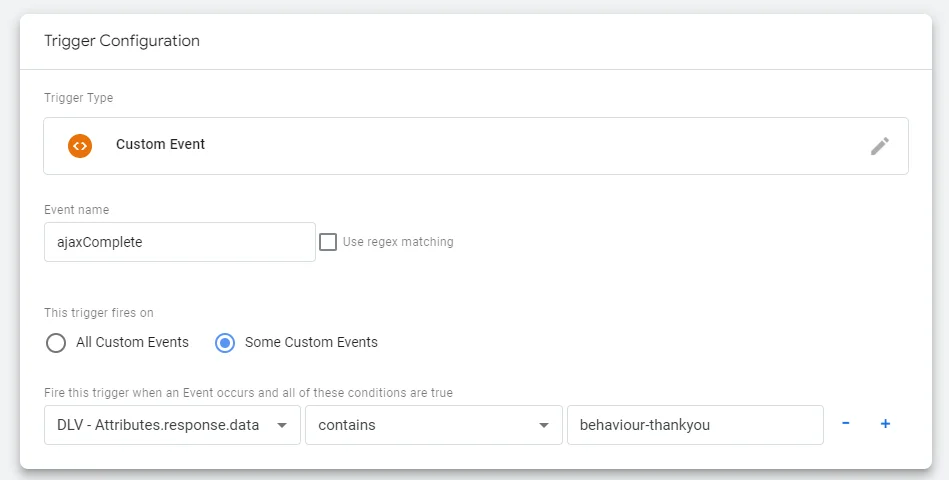
- Under Triggering, create a New Trigger
- Select Custom Event
- Under Event Name, add ajaxComplete
- Make the trigger fire only under Some Custom Events
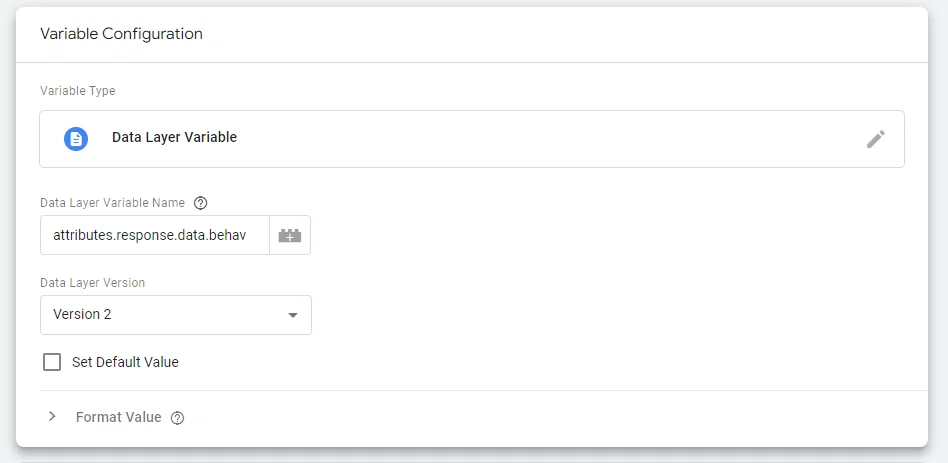
- Select the dropdown menu, and scroll down until you find New Variable
- Add the Data Layer Variable Name as attributes.response.data.behav
%22%20transform%3D%22translate(1.8%201.8)%20scale(3.51563)%22%20fill%3D%22%23fff%22%20fill-opacity%3D%22.5%22%3E%3Cpath%20d%3D%22M88.6%2026.2L84.5%2045%2072.2%2020l.3%2025.4zM220%2070h20v12h-20z%22%2F%3E%3Cellipse%20cx%3D%22191%22%20cy%3D%22123%22%20rx%3D%2212%22%20ry%3D%2212%22%2F%3E%3Cpath%20d%3D%22M15.4%20104.7l10.5%209.1-1.3%201.5-10.5-9.1z%22%2F%3E%3C%2Fg%3E%3C%2Fsvg%3E)
- Name the variable something like DLV attributes.response.data.behav and save it
- Set the variable value to behaviour-thankyou
%27%20fill-opacity%3D%27.5%27%3E%3Cpath%20fill%3D%22%23fff%22%20fill-opacity%3D%22.5%22%20d%3D%22M907.4%20379.3l-12%2036.8-13.3-4.4%2012-36.8zM598.7%20236l50%20112.3-6.4%202.9-50-112.4zM87.1%2088.2L68%2035.4l59.4-21.7%2019.3%2052.9zm-95.9-2.1L51%2047.5l-7%2066.8z%22%2F%3E%3C%2Fg%3E%3C%2Fsvg%3E)
- Save everything.
You can go ahead and run the Tag Assistant Preview Mode and check if the conversion is working.
Conclusion
I didn’t go into too much detail, so if you want to know why we used those variables and what the reasoning for some actions is, I encourage you to read the resources posted at the beginning of this post.
Setting up Conversion Tracking through Forminator can be more difficult than expected. However, you should get it working properly if you follow this guide. Next, make sure you set up Enhanced Conversion Tracking for Forminator, as well.