Hubspot is one of the most well-known CRMs, and its free tier outshines many of its paid competitors. You can find it consistently at the top of any free CRM list, and thus it’s very popular with many small businesses or startups.
Hubspot Free offers many tools for Marketing, Sales, Service, and Operation, and it’s a great startup point for many businesses. From there, they can scale with the Starter versions, which are inexpensive and a great deal for most businesses.
However, there are some features that we consider are must-haves, and that are only available in the much more expensive Pro versions.
One such example is Enhanced Conversion Tracking for Google Ads. While Hubspot started offering support for Enhanced Conversions in late 2022, they are locked behind Marketing Hub Pro, which is too expensive for most small businesses.
We’ve discussed the importance of Enhanced Conversions, especially in the cookieless world we’re about to enter, so let’s see how we can set them up.
Track Hubspot Enhanced Conversions Without Marketing Hub Pro
In this article, we’ll talk about two ways of implementing Enhanced Conversions on Hubspot without upgrading to Marketing Hub Pro.
- The first solution is to use the default Hubspot Forms, add the missing data to the Data Layer, and set up Google Ads Enhanced Conversions through Google Tag Manager.
- Set up Google Ads Enhanced Conversions by using a different Contact Form Plugin, that integrates with Hubspot. In our example, we will use Forminator to connect to Hubspot. The benefit here is that you can also remove the Hubspot branding message that appears if you’re using Hubspot Free.
Hubspot Form tracking with Data Layer
The first thing you need to do is to make the Hubspot Form send its data to the data layer.
This is quite simple to do. If you have already set up Conversion Tracking for Hubspot Forms, you just need to add this small piece of code to the Hubspot Listener tag:
'hs-data': event.data,If you don’t have that already, go ahead and create a New Custom HTML Tag in Google Tag Manager, name it Hubspot Listener, and paste the following code:
<script type="text/javascript">
  window.addEventListener("message", function(event) {
    if(event.data.type === 'hsFormCallback' && event.data.eventName === 'onFormSubmitted') {
      window.dataLayer.push({
        'event': 'hubspot-form-success',
        'hs-data': event.data,
        'hs-form-guid': event.data.id
      });
    }
  });
</script>
Set it to fire on All Pages.
Having trouble setting up conversions? Let us help!
Now, if you go to Preview Mode and submit the form, then head to the hubspot-form-success event and click on the Data Layer tab, you should see a lot of data being added.
If you scroll down, you will see all of your form fields and the submitted data. Now, all that’s left is to create some more Data Layer Variables for Enhanced Conversions.
We will create a variable for email, which we will use for Enhanced Conversions.
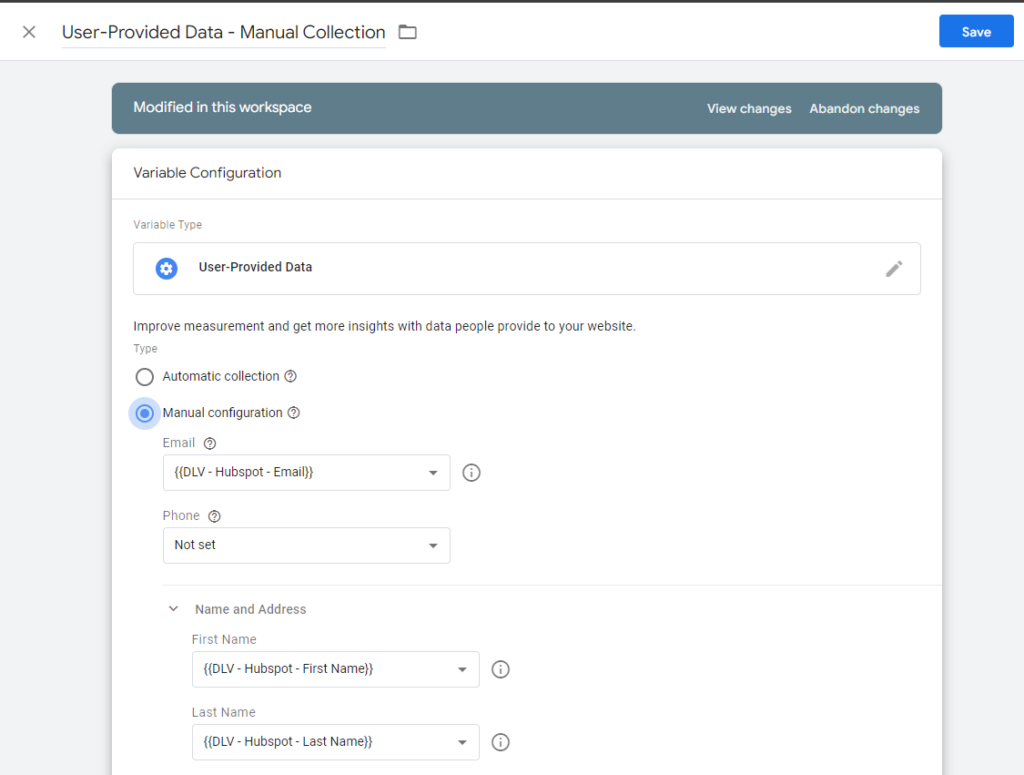
Go ahead and create a new Data Layer Variable, name it User Provided Data – Manual Configuration.
Select Manual Configuration, and under Email, scroll down and select New Variable, and create a Data Layer Variable.
Set the variable name to “hs-data.data.submissionValues.email” and name it something like “DLV – Hubspot Email”
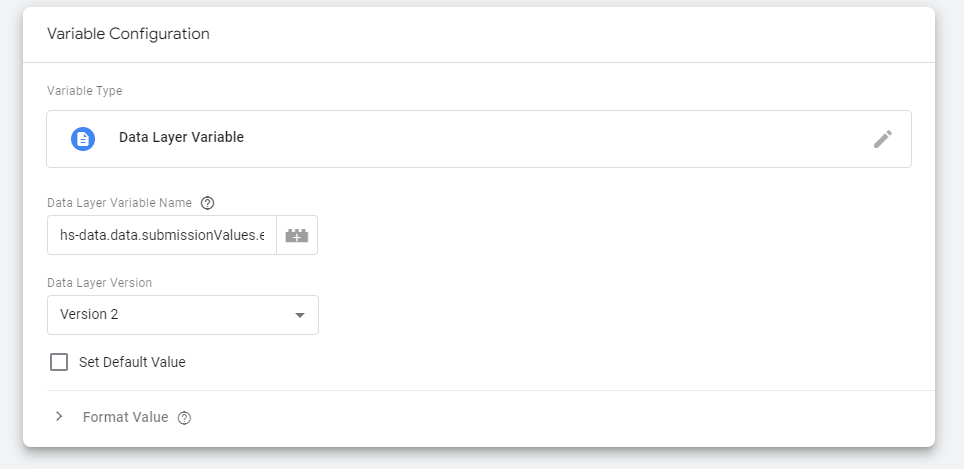
Save the variable.
You can do the same for Phone, or First and Last names, just change “email” in the variable name with the corresponding value from the Data Layer.
For example, for the first name variable, the name is hs-data.data.submissionValues.firstname and for last name it’s hs-data.data.submissionValues.lastname
Here’s how the User Data Variable should look:
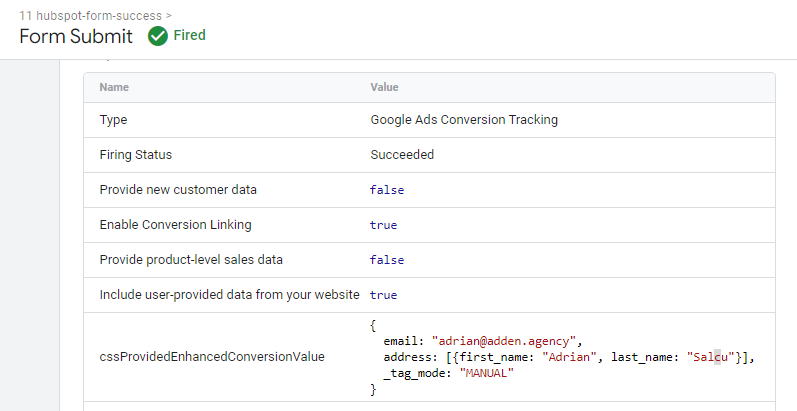
Now, if you go run Preview Mode and submit the form again, click on the hubspot-form-submit event and you will see that the variables are being populated.

And if you go to Tags and click on the Google Ads tag, you will see the data under cssProvidedEnhancedConversionValue
That’s it. Don’t forget to enable Enhanced Conversions in Google Ads.
Also, be mindful of sending Personal Identifiable Information such as email and names to Google Analytics. Even though it’s easy to do this, it shouldn’t be done and you risk getting your account disabled.
Using Forminator instead of Hubspot Forms
Forminator is a comprehensive Contact Form Plugin for WordPress. This, of course, means that you need to have a website running WordPress, but the main idea stands even if you do not: You can use a separate form on which you can set up Enhanced Conversions, that will then connect to Hubspot.
Why Forminator? You might ask.
The main benefit of Forminator is that it also help remove the “Create your free form with Hubspot” text, while also offering a Hubspot Integration on its free tier, alongside other would-be premium features such as payments and Stripe/Paypal integrations.
It’s one of the best-reviewed Contact Form plugins in the WordPress plugins repository.
Connect Forminator to Hubspot
The steps to set this up are relatively simple:
- Install Forminator on your WordPress site
- Configure your form. We recommend copying the form you used with Hubspot
- Go to Forminator Settings -> Integration and click the Connect button (+ icon) in the HubSpot row
- Go through the Setup
- Go to the Forminator form you designed at Step 2, and want to connect to Hubspot
- Go to Integrations and click the Activate button (+ icon) next to Hubspot, under Connected Apps
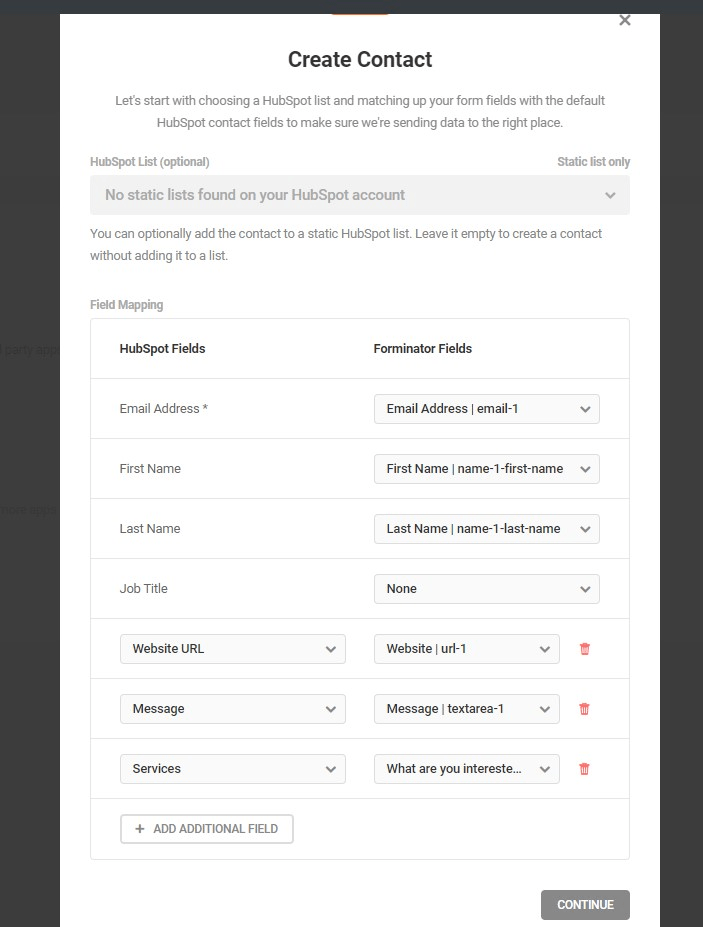
- Select a Hubspot List you wish to add the contact to (optional) and configure the form fields to match those in Hubspot
- Make sure to add more fields as needed
You can find more detailed instructions, with images for each step, on WPMU DEV’s documentation. They also cover Consent/GDPR integration, which I strongly suggest you implement.
Be sure to check this article to set up Enhanced Conversions with Forminator.
Conclusion
There are 2 ways to set up Enhanced Conversions for Hubspot without upgrading to Marketing Hub Pro, and both are very similar. The first is to set it up via the Data Layer and you need to modify the existing Hubspot Listener tag, or create it from scratch if you haven’t set up Hubspot Form Conversion Tracking yet. And then just create a couple of data layer variables for the desired data.
If you’re using WordPress, you an also set your forms up through Forminator, which, once set up it will act as the native Hubspot Form, but with more features.
You will be able to set up Enhanced Conversions through Tag Manager (in a very similar way), and, if you are on Hubspot Free, will get rid of the annoying “Create your free form with Hubspot” message. If you find the Hubspot WordPress plugin too heavy and only use it for forms, you can get rid of that as well.