There are a couple of ways of setting up Enhanced Conversions. You can let Google automatically gather the data, or set them up manually. Many users prefer to set them up automatically, however this isn’t ideal, and even Google recommends you implement an additional method for better results.
When it comes to implementing it manually, you can do it through Data Layer Variable, CSS Selectors, or directly through code.
While dabbling in code may sound scary and Data Layer Variables require more technical Tag Manager and Tag Assistant knowledge, setting up Enhanced Conversions through CSS Selectors is something anyone can do.
What are Enhanced Conversions and how do they work?
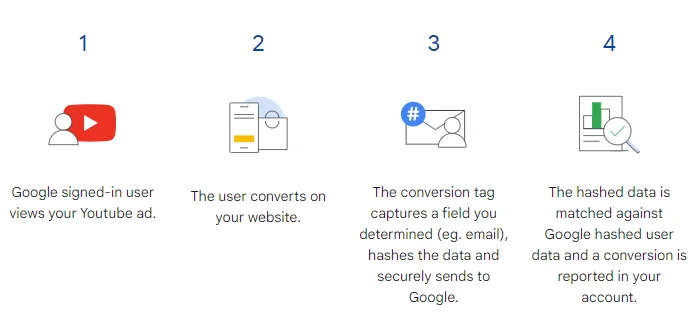
Enhanced Conversions can improve the accuracy of your conversion. It requires that a user that visits your site is signed into Google. Let’s take an example.
A user visits your website via Google Ads and doesn’t convert. It returns hours or days later by directly typing the website URL, and completes a purchase or submits a form. They may use a different browser, device, or delete cookies in the meantime, so normal conversion tracking wouldn’t detect this as a Google Ads conversion.
With Enhanced Conversions, when they submit a form or complete a purchase, their email will be hashed using SHA256 and sent to Google in a secure way. Google will then cross reference with their signed-in email, and if the hashes are a match it will attribute the conversion to Google Ads.
Prerequisites
There are of course a couple of prerequisites before setting up Enhanced Conversions.
- Google Ads Account (obviously)
- Tag Manager Account
- Form conversions tracking set up through Tag Manager
If you’ve been tracking form completes already, you’re good to go.
Turning on Enhanced Conversions in Google Ads
We recommend setting up Enhanced Conversions at the account level. If you don’t have the option available, you need to go to each Conversion you want to enable Enhanced Conversion for and set them up from there. The process is almost identical.
- Go to Tools & Settings -> Conversions
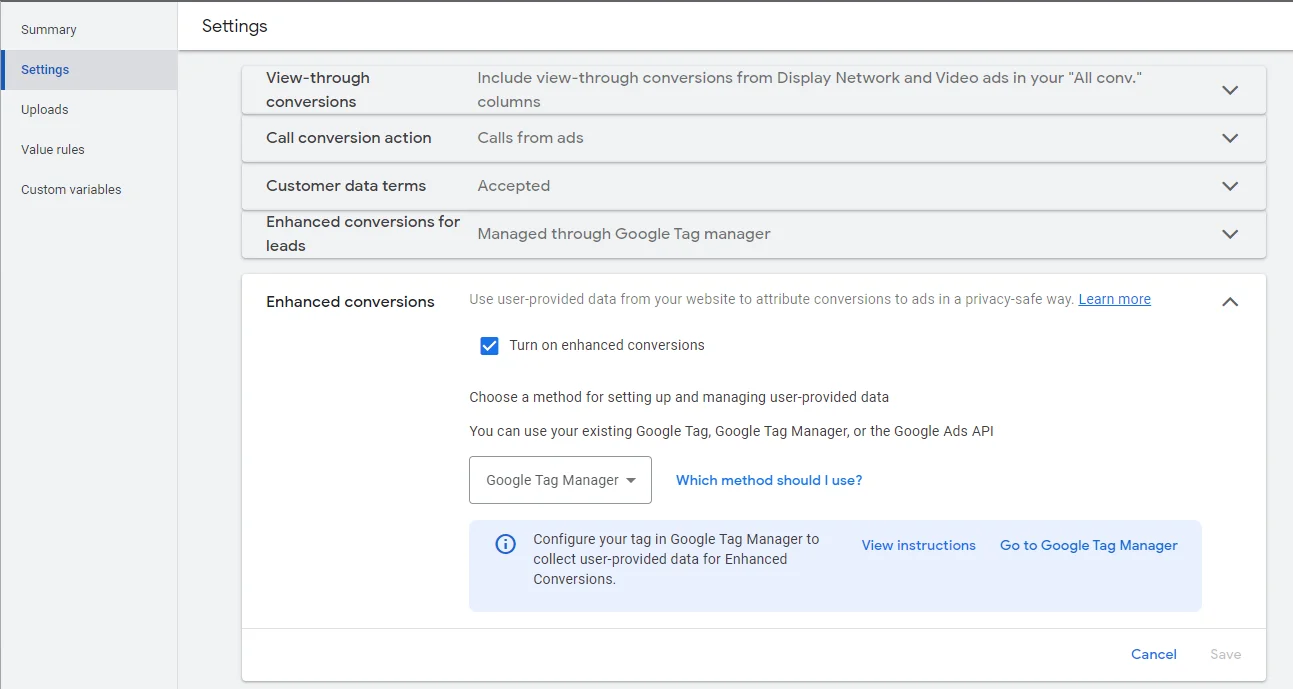
- On the left, click on Settings, and then Enhanced Conversions.
- Check “Turn on enhanced conversions”, and select Google Tag Manager as the method for setting up and managing user-provided data
%22%20transform%3D%22translate(1.8%201.8)%20scale(3.51563)%22%20fill-opacity%3D%22.5%22%3E%3Cellipse%20fill%3D%22%23cacaca%22%20rx%3D%221%22%20ry%3D%221%22%20transform%3D%22matrix(3.9587%2032.24588%20-112.1404%2013.767%2059.9%2014.4)%22%2F%3E%3Cellipse%20fill%3D%22%23fff%22%20rx%3D%221%22%20ry%3D%221%22%20transform%3D%22matrix(-23.27527%20-65.72735%20240.37357%20-85.12075%20156.3%2098)%22%2F%3E%3Cellipse%20fill%3D%22%23fff%22%20cx%3D%2256%22%20cy%3D%2268%22%20rx%3D%22255%22%20ry%3D%2224%22%2F%3E%3Cellipse%20fill%3D%22%23dedede%22%20rx%3D%221%22%20ry%3D%221%22%20transform%3D%22matrix(-3.24562%20-22.52303%2040.69952%20-5.86489%20101.7%2023.7)%22%2F%3E%3C%2Fg%3E%3C%2Fsvg%3E)
- Click Go to Google Tag Manager to open up Tag Manager, but come back to Google Ads.
- Go to Tools and Settings -> Conversions again and find the conversion you want to track. Click on it and make sure it says Enhanced Conversions are managed through Tag Manager. If not, edit the conversions and enable them.

Google Tag Manager Enhanced Conversions Setup
After enabling Enhanced Conversions in Google Ads, the next steps happen in Tag Manager and on the website.
- Go to Tag Manager, find and Click on the Google Ads Conversion Tag
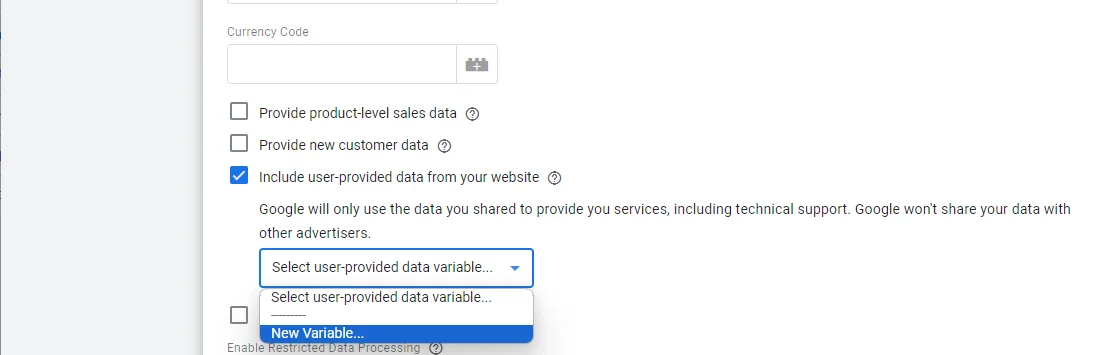
- Click to edit the Tag Configuration and scroll down to “Include user-provided data from your website”
%22%20transform%3D%22translate(1.8%201.8)%20scale(3.51563)%22%20fill-opacity%3D%22.5%22%3E%3Cellipse%20fill%3D%22%23cacaca%22%20cx%3D%2274%22%20cy%3D%2281%22%20rx%3D%2254%22%20ry%3D%2254%22%2F%3E%3Cellipse%20fill%3D%22%23fff%22%20rx%3D%221%22%20ry%3D%221%22%20transform%3D%22matrix(41.82547%20-56.52388%20179.33582%20132.70153%20168.8%200)%22%2F%3E%3Cellipse%20fill%3D%22%23fff%22%20cx%3D%2266%22%20cy%3D%223%22%20rx%3D%22255%22%20ry%3D%2227%22%2F%3E%3Cpath%20fill%3D%22%23fff%22%20d%3D%22M9-10l42.5%2029.7L5.1%2086.1l-42.6-29.8z%22%2F%3E%3C%2Fg%3E%3C%2Fsvg%3E)
- Check that, and select New Variable
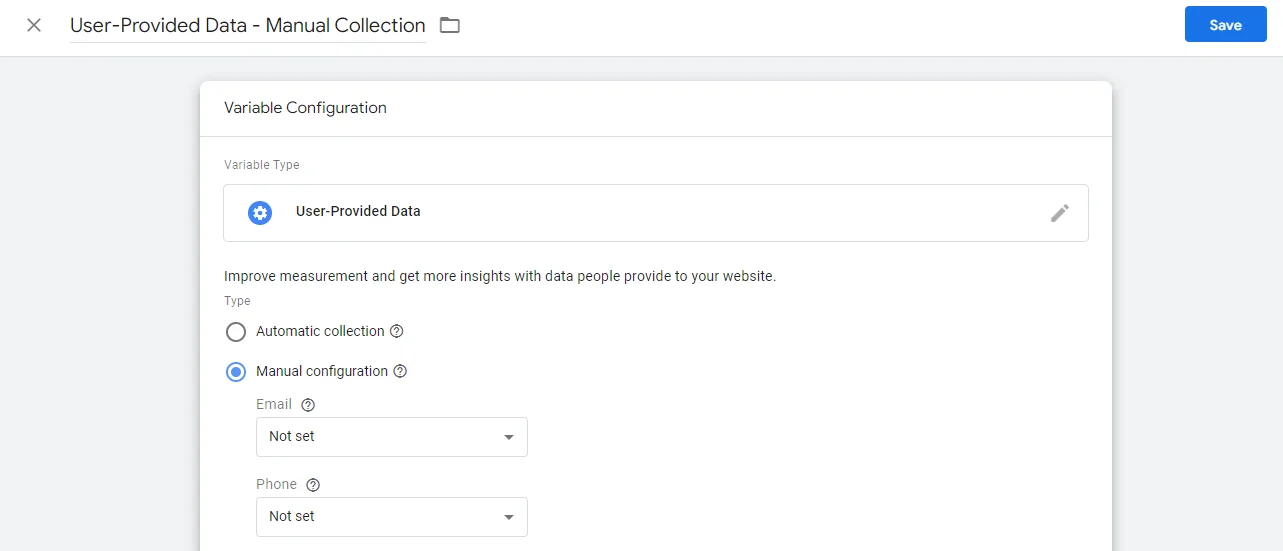
- Give the variable a name, like “User-Provided Data – Manual Collection”
- Select Manual Configuration
%22%20transform%3D%22translate(1.8%201.8)%20scale(3.51563)%22%20fill-opacity%3D%22.5%22%3E%3Cellipse%20fill%3D%22%23c7c7c7%22%20rx%3D%221%22%20ry%3D%221%22%20transform%3D%22matrix(13.4295%2019.86143%20-17.76734%2012.01356%20247.3%2011.7)%22%2F%3E%3Cellipse%20fill%3D%22%23fff%22%20rx%3D%221%22%20ry%3D%221%22%20transform%3D%22rotate(-23.1%20284.1%20-222.7)%20scale(140.80399%20149.23654)%22%2F%3E%3Cellipse%20fill%3D%22%23fff%22%20cx%3D%2291%22%20cy%3D%22109%22%20rx%3D%22164%22%20ry%3D%22164%22%2F%3E%3Cpath%20fill%3D%22%23dedede%22%20d%3D%22M236%200h20v34h-20z%22%2F%3E%3C%2Fg%3E%3C%2Fsvg%3E)
- Click on the Email field, scroll down and select New Variable
- Name the new variable something like “EC – Email”
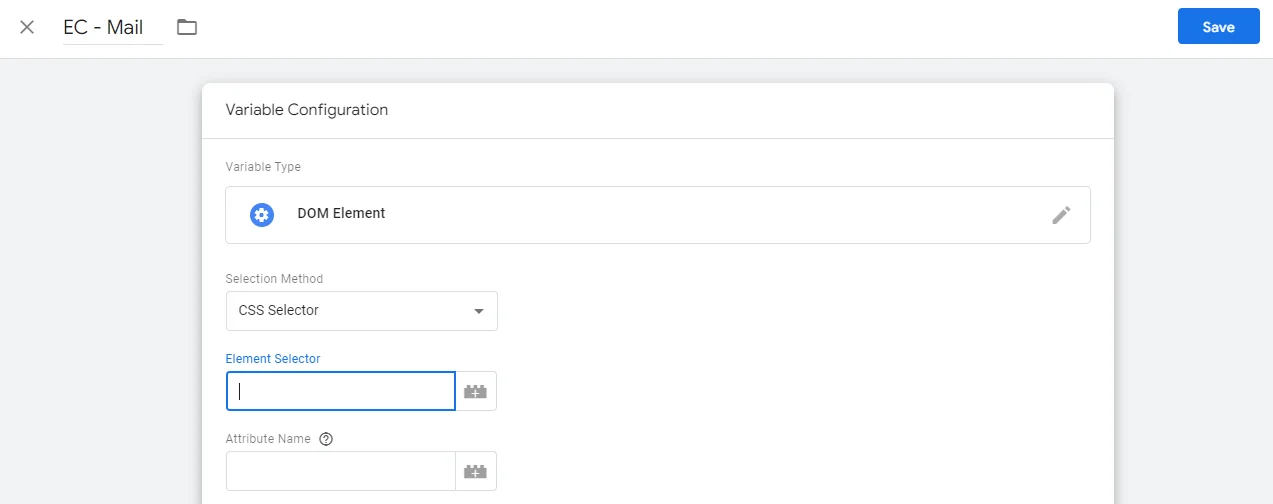
- Click on Variable Configuration, and select DOM Element
- Under Selection Method, choose CSS Selector
%22%20transform%3D%22translate(1.8%201.8)%20scale(3.51563)%22%20fill-opacity%3D%22.5%22%3E%3Cellipse%20fill%3D%22%23c6c6c6%22%20rx%3D%221%22%20ry%3D%221%22%20transform%3D%22matrix(-21.99246%206.97837%20-8.12034%20-25.5914%20246.6%205.4)%22%2F%3E%3Cellipse%20fill%3D%22%23fff%22%20cx%3D%22113%22%20cy%3D%2265%22%20rx%3D%22124%22%20ry%3D%22124%22%2F%3E%3Cellipse%20fill%3D%22%23fff%22%20cx%3D%2296%22%20cy%3D%2292%22%20rx%3D%22152%22%20ry%3D%22152%22%2F%3E%3Cpath%20fill%3D%22%23dedede%22%20d%3D%22M235%2031h36l-43-47z%22%2F%3E%3C%2Fg%3E%3C%2Fsvg%3E)
- Now you need to go to the page where the form resides, in order to get the CSS Selector.
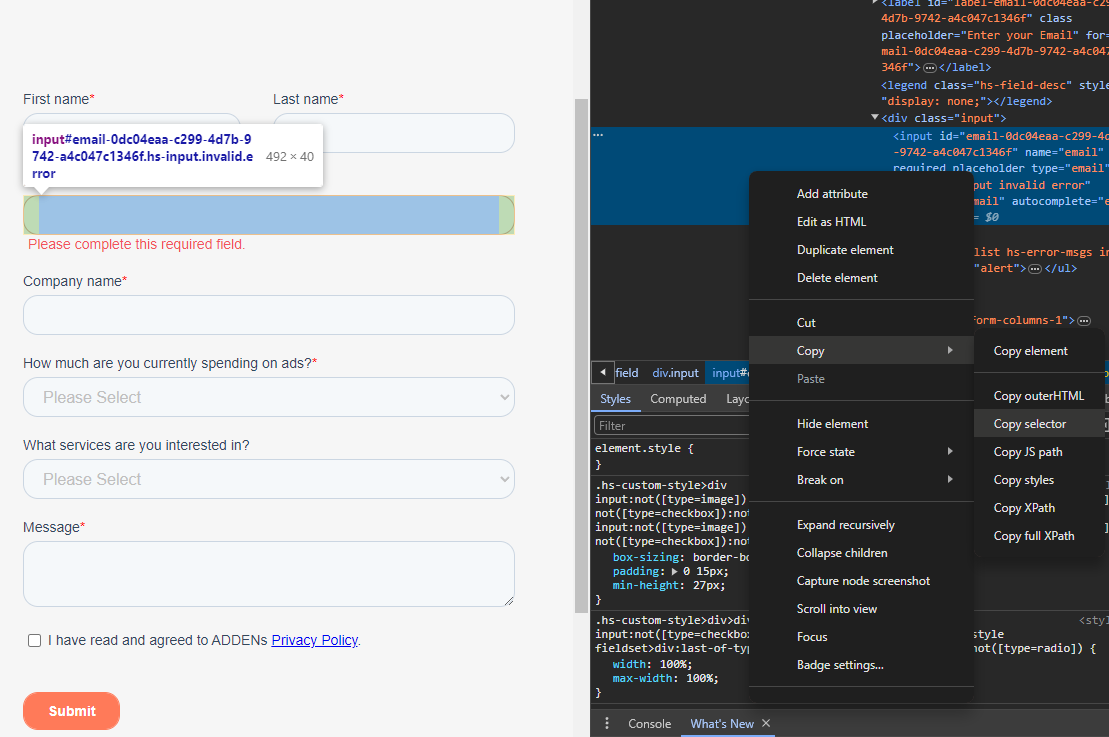
- Right-click on the Email field, and select Inspect. This will open Developer Options in your browser and some code will be highlighted
- Right-click on the highlighted code, hover over Copy ->, and select Copy Selector
%22%20transform%3D%22translate(1.8%201.8)%20scale(3.51563)%22%20fill-opacity%3D%22.5%22%3E%3Cpath%20d%3D%22M259-29.5l8%20230.8-120%204.2-8-230.8z%22%2F%3E%3Cellipse%20fill%3D%22%23fff%22%20cx%3D%2249%22%20cy%3D%2295%22%20rx%3D%2274%22%20ry%3D%22255%22%2F%3E%3Cellipse%20fill%3D%22%23fff%22%20cx%3D%2251%22%20cy%3D%22125%22%20rx%3D%2261%22%20ry%3D%22255%22%2F%3E%3Cellipse%20rx%3D%221%22%20ry%3D%221%22%20transform%3D%22matrix(30.36038%2096.88009%20-46.08379%2014.44178%20230.2%20128.6)%22%2F%3E%3C%2Fg%3E%3C%2Fsvg%3E)
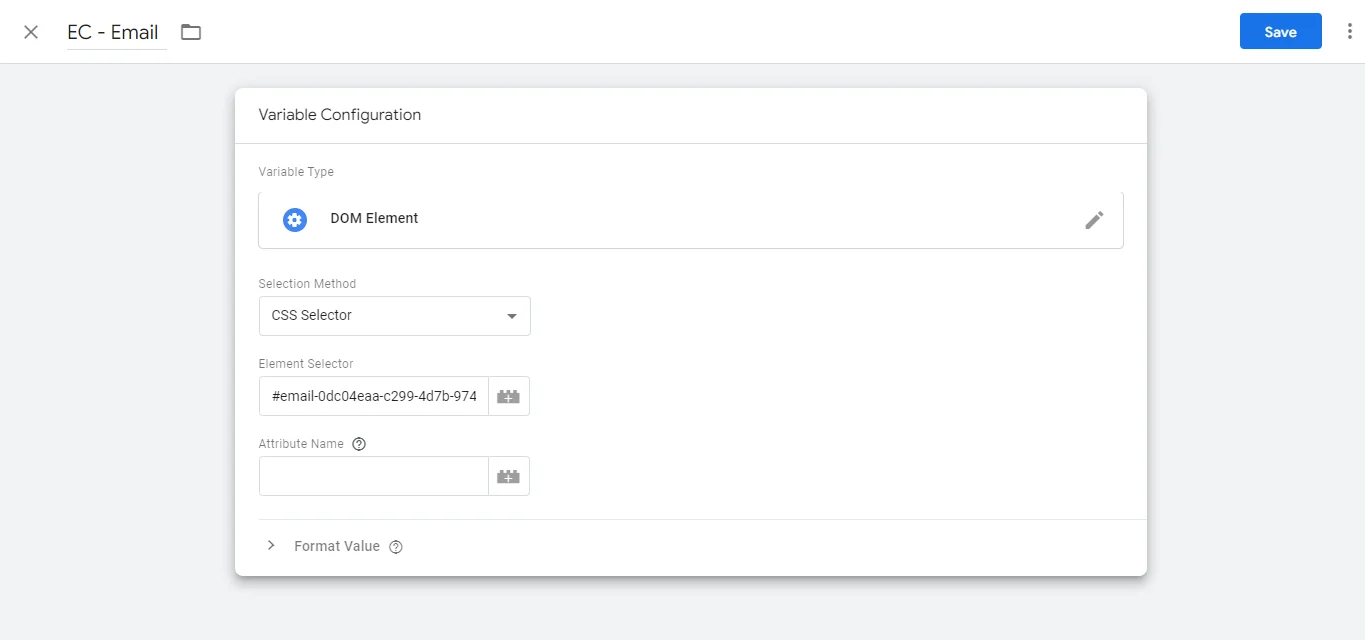
- Go back to Tag Manager and Paste the selector you copied, and Save.
%22%20transform%3D%22translate(1.8%201.8)%20scale(3.51563)%22%20fill-opacity%3D%22.5%22%3E%3Cellipse%20fill%3D%22%23c4c4c4%22%20cx%3D%22249%22%20rx%3D%2227%22%20ry%3D%2234%22%2F%3E%3Cellipse%20fill%3D%22%23fff%22%20rx%3D%221%22%20ry%3D%221%22%20transform%3D%22matrix(-115.18098%2057.96847%20-75.9632%20-150.93577%20117.4%2082.8)%22%2F%3E%3Cpath%20fill%3D%22%23dfdfdf%22%20d%3D%22M224.4%2010l19.7-11.8L259.6%2024l-19.7%2011.9z%22%2F%3E%3Cpath%20fill%3D%22%23fff%22%20d%3D%22M264%2038l-31-6%2023%2092z%22%2F%3E%3C%2Fg%3E%3C%2Fsvg%3E)
- Do steps 6-13 for the Phone Field as well.
- Save everything and Publish the changes.
Enhanced Conversions Validation
After setting up everything, you need to make sure it actually works. This method doesn’t work on some forms, like the ones that use AJAX. There are 2 ways of validating
Validate through Chrome Developer Tools
The quickest way to validate is through Chrome Developer Tools.
- Right-click on your web page.
- Select Inspect.
- Select the Network tab.
- Enter “google” in the search bar.
- Find the network request that’s going to “googleadservices.com/pagead/conversion/” (or “google.com/pagead/1p-conversion/” on some browsers).
- Click the Payload tab to view the list of query string parameters.
- Look for a parameter “em” with a hashed string as the value. The value should start with “tv.1~em” followed by a long string of characters. If you see the “em” parameter, this means that the enhanced conversions tag is picking up and hashing the
enhanced_conversion_dataobject.
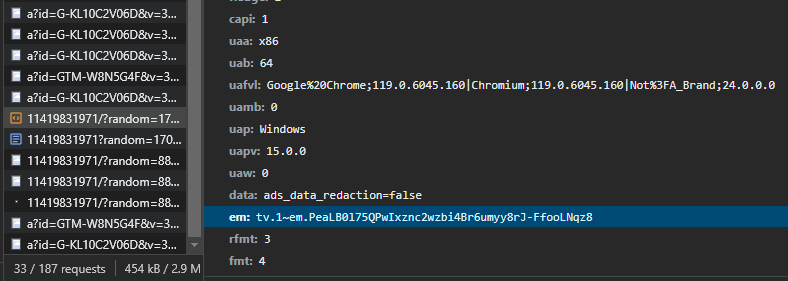
If the tv.1~em parameter doesn’t have a hashed string after it, it means that the enhanced conversion tag is not picking up the enhanced_conversion_data object.
Validate through Tag Assistant
- Go to Tag Manager and hit Preview to open Tag Assistant
- Go through the conversion steps, fill out the form, and submit
- In Tag Assistant, go to the event that fires the conversion tag
- Click on the Google Ads tag that fired, and Show More
- Make sure you select Values in the top right corner
- Check that cssProvidedEnhancedConversionValue contains the email you added, for example it should say something like this: {email: “adrian@adden.agency”, _tag_mode: “MANUAL”}
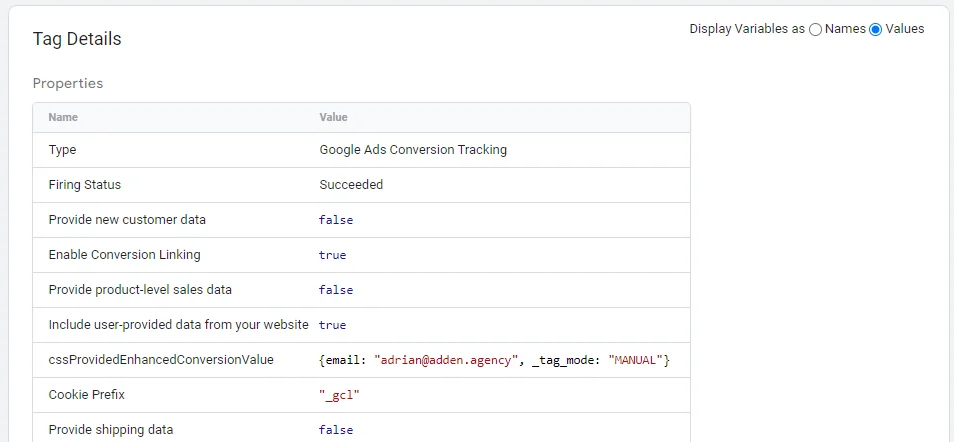
In this case we have only gathered the email. Ideally, you would also have the phone number in there.
If this returns a value of null, you need to look at other ways to implement Enhanced Conversions, such as through the Data Layer, or JavaScript.
Conclusion
Setting up Enhanced Conversions through CSS Selectors is one of the easiest ways of doing so, but you need to verify that the implementation is actually working.
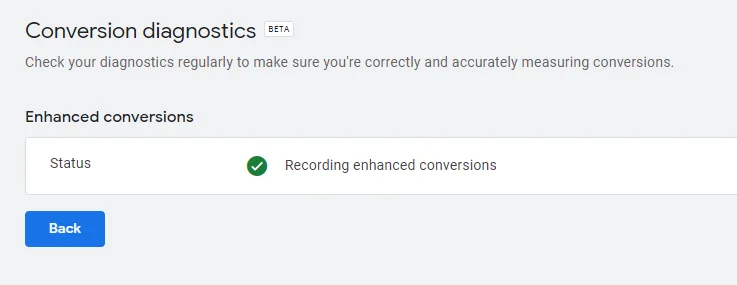
Once you confirmed it’s working, it will take a while to see results in Google Ads. After 48 hours, you should check the Diagnostics tab under the conversion action that has enhanced conversions enabled.
Setting up Enhanced Conversions is more important than ever, as we are fast approaching a cookieless future, where we’ll be forced to rely on first-party data.